Wednesday, 26 October 2011

The 1D-X Dilemma

Starting the Search for the Perfect Flywater Exposed camera


Flywater X, 1D-X........it just seems to fit. But will this be the perfect camera to take on a flyfishing trip like the one this blog is all about?


The 1D-X replaces both the 21MP 1Ds MkII (pictured  above) and the 16MP 1D MkIV. 
Images courtesy Sydney Camera Style 


I mentioned in an earlier post that I was going to talk about the new EOS 1D-X that Canon recently announced. To be honest when reading the announcement, I was a little disappointed. I was hoping to see my perfect camera announced, and was expecting it to be a direct  replacement for the approximately 4 year old 1Ds MkIII. Instead, with the 1D-X, Canon had finally merged its two 1 series cameras to produce one camera somewhere in between.  


What I had hoped for were:


  A sensor with between 28 and 36MP
  Improved dynamic range
  Improved Autofocus


Not too much one may think, and I guess that with the new camera, according to the information and specs from Canon, I may have got two out of three. The surprising thing was that the only one that I thought I could count on getting, the increase in megapixels, was the only one that didn't eventuate. In fact, the megapixel count has decreased and is down by some 3 million pixels. A relatively minor decrease, but since I shoot a lot at ISO where digital noise (graininess) isn't really a problem, and I want to print large, exhibition prints. I would have liked to have  more resolution, and from what I am reading, most others who shoot landscapes or work in the studio are of similar mind. Canon seems to think that the superior image quality that this machine is capable of producing will make up for the slightly less resolution over the 1Ds MkIII, and I guess that at this stage we should just give them the benefit of the doubt, at least until the camera is made available and can be tested properly.


Well, that is the main negative out of the way. There are a lot of things about this camera that sound great, and if they all work as promised, then despite the slight "lack" in resolution, it should be a fantastic camera. Firstly is the fact that like previous 1 series Canons, it is sure to be built like a tank and should stand up to almost any environment, no matter if it ventures to Antarctica or the Sahara. It will definitely be well sealed from the elements. Canon also claims that its autofocus is improved, and that its new metering system (which has a processor all to itself!) is much improved. From pictures that I have seen, and from what I have read elsewhere, it seems that button placement and controls are also an improvement over older 1 series bodies that it replaces which were already great. Now, if those larger pixels and newer technology combine to produce greater dynamic range like that of the Nikon D3X or the Phase One IQ180, then it is likely to produce very impressive image quality. The 1D-X also shoots fast, especially considering it has a full frame 18mp sensor. This at first seemed of no use to me, however if a hooked fish jumps, a fast frame rate is certainly an advantage in capturing a great shot of it.


One last thing that seems to come up everywhere this camera is mentioned is the ISO range which can be boosted to a mind boggling ISO 204, 800! Its claimed low light capabilities seem impressive, and it will be interesting to see how it compares to the current high ISO king, the Nikon D3s I have no doubt that it will be good, but exactly how good remains to be seen. That being said, I just saw this new low light video sample which does look pretty good. I am thinking at some point I am going to have to start doing a bit of filming while out fishing so I can post some clips here. More importantly perhaps some good footage to supplement the images and text might be nice while on the Flywater Exposed trip. My 7D should do a reasonably good job for now, I just need to work out what I am doing as shooting stills is quite different to shooting video. If I start soon, I should have a reasonable amount of experience by the time I get to Flywater X. 


If you have read through to here, you will have picked up that this camera is sounding pretty good (of course we are only going by the specs as it isn't even available yet), but it is not perfect for Flywater Exposed. Problem is, there is no perfect one camera solution. It could still end up being the best compromise between image quality, portability, ruggedness and features that sees it coming along for the trip. Once it is actually being used by photographers, it and its images can be assessed properly.No doubt we will look into this further after March 2012 when it should hopefully be in stock locally, and we will also be exploring other possibilities along the way.

Saturday, 22 October 2011

First Day on the Water for the Worst Fly Rod Ever

Catching Fish, and it isn't even finished!


This brown took a bead head wooly bugger fished close to the bottom


Well, this rod still needs some work, but it is now fishable. Despite the gap between the two pieces of cork and still having the original cheap wire spin guides, I decided to take it out for a fish after work. The fish were rising in the tail of the first pool I approached, but the only way to get the fly to them from my position was with a downstream cast across the pool, thus allowing the fly to continue downstream to the fish. They blatantly ignored a number of good presentations before I spooked them. It was a frustrating start. It didn't help that the bank behind me was steep and had plenty of grass and foliage to snatch a fly on the backcast. This was the first problem I noticed with the rod - the length. It didn't like roll casting, nor was it easy to get the back cast over the tall grass. At only around 5 foot long, I decided that its real place is in super tight water with a lot of overhead cover to impede casting.  It also didn't help that I could see absolutely tiny mayflies around, but I didn't have a fly small enough to imitate them in my box.


Back to that first pool, I had spooked all the fish in the tail out, but suspected some fish would be hanging in the deep mid section, and if I went deep then perhaps there were some that had not been spooked from my previous casts. I tried a brown bead head wooly bugger, and had fish come up slashing at the fly but no hookups. I decided to let it sink almost right to the bottom amongst the small boulders and work it close to the bottom. A few strips and the fish pictured above snatched the fly and came straight up, launching itself clear of the water. I decided to take a quick shot with the phone since it was the first fish for the rod, but I was disappointed that it was not taken on a dry.I went on to hook three more - all on a parachute adams, landing two and spooking a number of other fish on approaching their pools. Not bad for the first outing. It looks like this might be a rod that sits in the car permanently for those quick unplanned trips, or just as a backup. I need to get the grip tidied up; both between the grip and reel seat, and the grip itself could do with a little more sanding. A few proper snake guides and some neat bindings will finish up a fun little project. 


I am not sure that it is the worst fly rod ever, but I am pretty certain it would be close. I did discover that it wasn't too bad for bow and arrow casting into tight spots, as long as distance wasn't important. No doubt you will see more of this rod around here from time to time.

Tuesday, 18 October 2011

Canon EOS-1D X announced

Is this the perfect Flywater Exposed adventure camera?

Just announced is the new Canon EOS-1D X. Already people are the talking, wondering if this is really the replacement for the 1Ds MkIII, since it has less pixels (18MP for the 1D X VS 21MP for the older 1Ds MkIII). I will be looking into it as a possibe camera for the trip. I will also talking about it in more detail after comparing specs more carefully and working out exactly what I need.

For a sneak peek of the 1DX, check out this on dpreview or for a more official source, here on Canon USA's site.

Sunday, 16 October 2011

My Fly Art

"Permit Tailing on Crab Fly" - Pastels, Sharpie, and Pen.

As mentioned in the previous post, I have just recently decided to start drawing again. I may even eventually start painting.  It has been a long time since I have done anything more than just sketching in a notepad or on a scrap of paper though. Today I got out a heap of my old artwork and had a look at if tor the first time in a few years. My tastes certainly have changed since then, and I could also see how my work had changed over the years. Below are a few of the images that I saw today. I simply put them on my dining table and snapped away under the available tungsten lighting with my 17-40L on the Canon 7D. I white balanced them by eye, so they are not accurate but give a pretty good idea of how the drawings look. I am even thinking that producing a few drawings from Flywater X might be a cool way to supplement all the photos that will be taken. 

These drawings are all for sale, and profits will be put towards equipment purchases and travel costs for the Flywater Exposed project. For details and pricing, please email me.

Firstly, here are some crops of the above drawing.

 Crop from "Permit Tailing on Crab Fly"

 Extreme crop from "Permit Tailing on Crab Fly" (Larger than actual drawing)

Another extreme crop from "Permit Tailing on Crab Fly" (Larger than actual drawing)

This fly image below is similar to the new drawings I am about to start working on. They are relatively small and will be very reasonably priced for original artworks. No prints will be produced, so you can be assured of getting something that no one else has on their wall. Each will be hand signed.


 "Parachute Hackled Dry Fly" - pastels and pen

This last drawing is different to what I usually do. It is quite abstract compared to my other work, but for some reason I like it.


 "Vertical Brown Taking Dry" - pastels

 I have not shown any of my colour pencil drawings here yet, but in the past they were one of my favourite things to use. I also quite enjoy using lead (graphite) pencils to produce monochrome drawings. I am sure at a later date, some of my new drawings using both of these materials will show up on Flywater Exposed somewhere. Keep an eye out for them!

Wednesday, 12 October 2011

Art For Sale Soon!

I have recently been sketching a lot, and with Flywater Exposed as well as my new book project I figured I am going to have to come up with a way to supplement my regular income to get things happening as soon as possible. I used to do a lot of artwork in the past (even studied visual arts at university for a year), but haven't done much for the last few years. I am going to start small and produce a series of original fly fishing related pieces which I will offer for sale. Funds will go towards both projects. Hopefully I will have some new work ready in the next few weeks. Prices will be extremely reasonable for original pieces of art - more details and pictures soon.


I also have a pen, sharpie and pastel drawing that I did a couple of years ago of a tailing permit sizing up it's prey - a merkin crab fly. I am thinking of selling this piece as it was commissioned, sent to the client COD, and returned to me unopened. Not sure what happened, but it has been sitting still packed away ever since. I will have to get a picture of it posted here and get the size in case anyone is interested.

Friday, 7 October 2011

Worst Fly Rod Ever?

Turning One Bad Rod Into Another

A little while ago, I stumbled across some $5 rod and reel combos and just couldn't resist buying one. I knew it's fate immediately. It was going to be my first solid glass fly rod. A test cast with a 4wt line told me that it may be better with a 5 or 6wt line for the short casts that I would be using it for. I will figure that out once the rod is rebuilt though.

You get what you pay for!

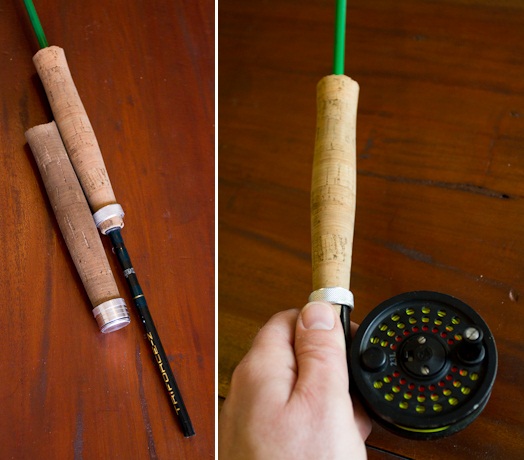
Step one was to get rid of the reel seat, and find something to replace it with. A couple of broken graphite fly rods became donors. removing the original one piece plastic grips and reel seat from the green beast revealed that the bottom half of the blank was shorter than the top. 


With a mini hacksaw, I managed to cut off the cork that I needed from both of the old rods, as well as cutting through the metal on one reel seat to remove the bits I needed to create my own cap and ring seat. I decided to trim and reverse one of the original grips to make a short half wells style grip. It needs a bit more sanding to get it the way I want it, but it feels ok in the hand. Certainly good enough for this rod! The second grip pictured below was sanded considerably after the photo was taken to allow the threaded ring to slide over it to hold the front of the reel foot in place.

o

The finished reel seat is nothing special, but is seems to hold the reel securely. I think I spent enough time sanding it considering it was going to end up on what could possibly be the worst fly rod ever made. The end cap, cut from the same original reel seat fits perfectly in place. Now it's just a matter of deciding how much to trim off the front and cutting it down, filing the inside graphite tubing so it slides onto the blank extension behing the grip, and gluing everything in place.


I am still trying to decide if I will strip off the few cheap wire guides and put on some snakes salvaged from one of the graphite rods. If I find a line that it casts well with, then I may just do that. I'm even thinking of stripping the green paint from the blank and leaving it as plain white glass. I will decide that if and when I strip the old guides off. 

More than anything, I can't wait to take this thing down to my local stream and catch a trout with it. No doubt there will be a report with pictures to post up once that happens.

Thursday, 6 October 2011

Improving Your Fishing Photos With Flash

Fishing Photos With a Difference
There are at least three types of shots that come to mind when I think about fishing magazines. Those lit entirely with natural light (usually daylight), those shot with fill flash, and a few that are taken at night time with flash. The first two types can look fantastic, but those flash lit night shots are not too appealing to the eye. A well lit angler holding up a fish which often has a glowing eye and overexposed scales standing in blackness is what typifies these shots. To me, they are only any good as a record of a special capture when there is no other way of getting the shot.

Off camera flash can make your photos stand out from the rest

Controlling the Light and getting creative
Using fill flash is a good way of controlling shadows caused by strong sunlight. It can improve the look of a photo immensely and is one of the most important things someone new to outdoor photography can learn. That being said, it isn't overly creative.

You come to appreciate what a difference being able to control the light makes to a photograph after working with studio lighting on location. It allows you to create an image that makes your work stand out from a typical happy snap. If it wasn't for the pure impracticality, I would love to have a battery powered strobe system along on all my fishing trips. Unfortunately, carrying around my favourite portable Elinchrom flash system, the Ranger RX, or even the much smaller but less powerful Ranger Quadra RX is not a possibility on a normal fishing trip. Apart from the battery packs and flash heads, there are other things that also need to be carried including light stands and accessories. Then there is the worry of wind blowing it over, and water damage when you need to get in close to the waves to capture that unusual angle. In my case, it also means hiring the gear as I still don't own my own. It is certainly not cheap to buy. My solution is to use a hotshoe flash, often called a speedlite.  

I am not going to be able to cover everything here - in fact that is not my intention. I will be writing a follow up post shortly to detail the necessary equipment and how to use it. Also, before we go any further I need to point out that getting the most from this post relies on you understanding not only the basics of exposure, but also how to set the flash output to balance your flash lit subject with the background. With some advanced compact cameras, you can get some of the results you see here, however for the most part this is the domain of SLR or other cameras that have a hotshoe to allow a speedlite to be used. For best results though, having a system that allows you to get your flash off the camera gives you the most flexibility and the opportunity to capture the best shots. For now a few examples will give you an idea of what can be done.

 Top Left - No flash. Top Right - On camera flash. Bottom - Off camera flash

The example above shows a series of shots of my mate Joel taken after a fishing session on what is usually a surf beach. The first shot was taken without flash, and was exposed for the background. The second was taken with a speedlite mounted on the cameras hotshoe throwing  light onto Joel from the camera position. It is worth noting that this shot can be achieved with a cameras built in flash providing it is powerful enough. The bottom shot was the final result. It was achieved with the flash held by one of the other guys I had been fishing with. He held it high and to  my left, aiming it down at the subjects face. You may notice that unlike the shot with direct on camera flash, there is a shadow side to the subject which gives a very different look than the more typical direct flash look.

The two shots below are typical "grip and grin" shots. The first shot was taken with the flash on camera. The second one, the flash was hand held off to one side. Ignoring the backgrounds and colours - which do you prefer?

This type of shot is common in fishing magazines


With the flash off camera, the shadows created make for a more striking, 3 dimensional looking image


Saturday, 1 October 2011

Book Project

Firstly, apologies for the gap between posts. No photos or images today, but some ideas I have for a book project. I have a couple of ideas and one in particular I would like to talk about here.

For the last few years, I have been contemplating putting together a book on fly fishing legends. The idea was to compile a list of some of the most influential living fly fishers in the world, and to photograph them. Writing down some notes after chatting with them would compliment the images and I would have the makings of a book.

It didn't take long to realise that this idea was too broad, but still I couldn't shake the idea of photographing such legends of the sport as Bernard "Lefty" Kreh, Charlie Smith, and a host of others. Thus the plan hatched to make a series of books.  At worst, a single book and a small collection of photographs which may be useful for publication elsewhere, but more importantly would be significant to me to have as a part of my personal work.  

Being from Australia means that the most practical thing to do is to work on an Aussie fly fishing legends book first. If the opportunities come, then I can always photograph international legends in between and keep these aside for other books later on if I build a large enough collection. I guess the most important thing to do now is to write a list of who I want to include and then find a way to contact them to see if they are interested in taking part. Not only will it be fly fishing personalities, but I want to also include some fly tiers tackle designers and authors who are important to Australian fly fishing.

I will be posting a full list here soon. Who knows, you may also be able to tell me who else is deserving of the "legend" status who I might have missed. Perhaps you even know someone who is on the list and can help me get in contact with them.

To get things started, here are a few people (in no particular order) I would like to include and will be trying to contact soon for the Aussie book:

Rod Harrison
Rob Sloane
Greg French
Rob Meade
Max Garth
Murray "Muz" Wilson

There are quite a few others to be added, but this is a start.